Project Overview
The HealthCamp Data Collection App was designed to streamline the process of collecting patient data during medical camps in remote areas. The application enables healthcare workers to efficiently record patient information, medical history, and examination results using mobile devices.
This application is designed for three types of users: Volunteers, Administrators, and Medical Practitioners. All users will go through the same registration and login process. Once logged in, each user will be automatically directed to their own personalized dashboard based on their role.
This means that while everyone uses the same app, the features and information you see will match your specific responsibilities. The system was built to handle offline data collection, ensuring that healthcare workers can continue their work even in areas with poor internet connectivity.
Use Case Diagram
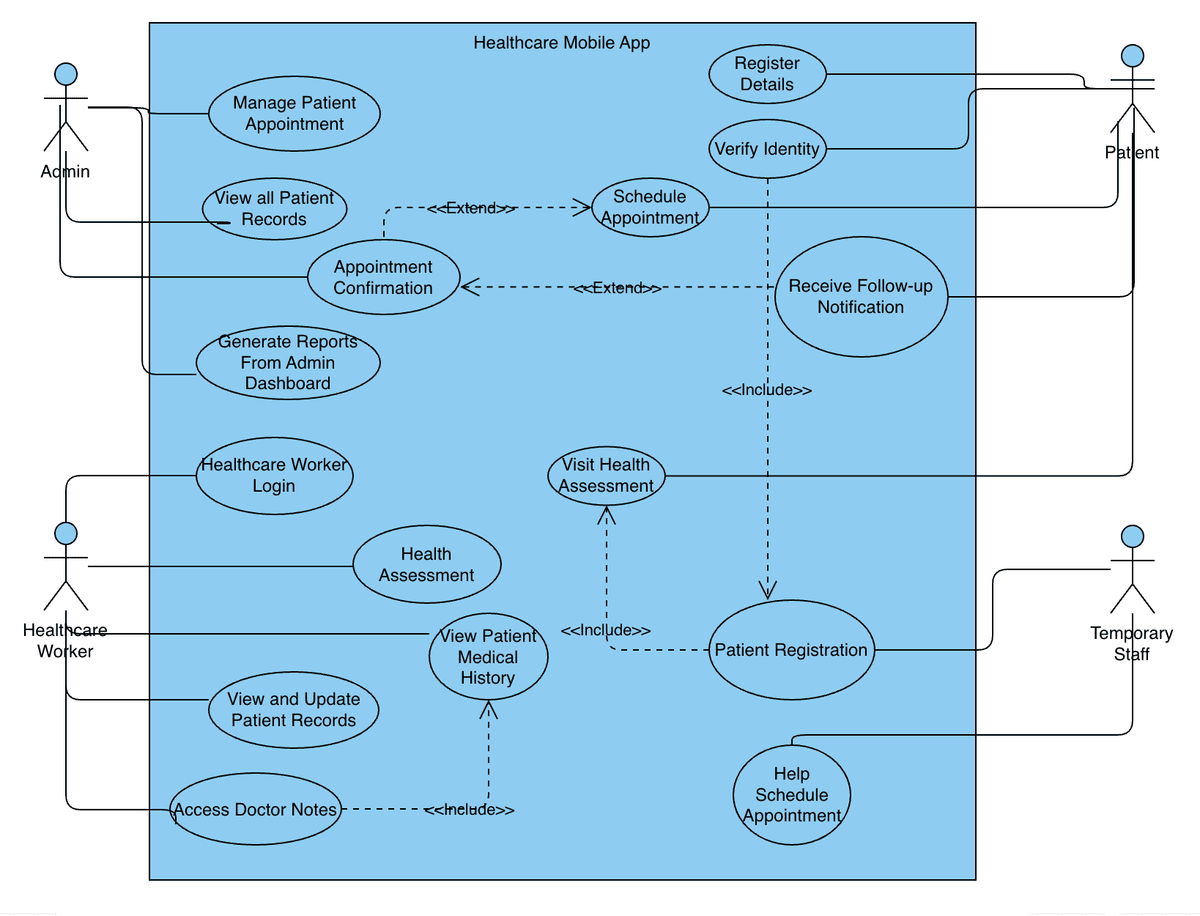
System architecture Diagram
User Registration Process
Step 1: Navigate to Registration
Navigate to the registration page by clicking "Register" on the login screen.

Figure 1: Main HealthCare Page - Login Screen
Step 2: Enter Personal Information
Enter your personal information (name, email, contact details), select your appropriate role (Volunteer, Admin, or Practitioner), create a secure password following the system requirements, and optionally enable fingerprint authentication for quicker login on future visits.

Figure 2: Register Page - Personal Information Form
Step 3: Review and Submit
Review and submit your registration.

Figure 3: Officially Registering - Review Page
Step 4: Admin Authorization
Wait for admin authorization before you can log in with your credentials.

Figure 4: Admin Authorization - Pending Approval
Volunteer Role
Dashboard Overview
After logging in, you'll see your volunteer dashboard with patient registration tools and patient lookup function.

Figure 8: Volunteer Dashboard
Patient Registration Process
From your dashboard, select "New Patient Registration" (Station 1) and complete the Basic Information form.

Figure 9: Basic Patient Information Form
This is the collecting patient data part of the workflow model.
Patient Lookup and Progress Tracking
Navigate to the Patient Lookup page (Volunteer on Station 2), enter the patient's Aadhaar number and press search.

Figure 10: Patient Lookup Page After Entering Aadhar Number
Click "View Progress" to open the Patient Progress Page. This page displays the status of all three stations:
- • Registration – Marked as Complete after initial submission (Done at Station 1)
- • Medical History – Marked as Not Done if not filled yet, with an option to Fill Out Form
- • Testing – Marked as Not Done if not filled yet, with an option to Fill Out Form

Figure 11: Patient Progress Page
Station 2: Medical History Form
When moving from one station to another, the volunteer will search patient Aadhaar number to complete the Medical History section by clicking "Fill out Form".

Figure 12: Patient Medical History Form
Station 3: Vision Test Form
Complete the Vision Testing section as needed by clicking "Fill out Form".

Figure 13: Patient Vision Test Form
Administrator Role
Dashboard Overview
The main admin dashboard provides a comprehensive view of system activities:
- • Total number of patients and staff
- • Intuitive and interactive graph displaying disease cases over time (e.g. diabetes, hypertension, heart disease)
- • More information about disease trends

Figure 14: Main Admin Dashboard
Account Management
Navigate to the "Authorization" page from your dashboard (Hamburger Icon).

Figure 15: Admin Dashboard
Review pending account requests and approve or deny requests with optional comments.

Figure 16: Admin Authorization Page
Authorized users will automatically receive email notification.
Site Management
Access "Site Management" from your dashboard (Hamburger Icon).

Figure 17: Admin Dashboard
Search for existing user accounts by name, email, or role.

Figure 18: Site Management Page
View account details and current permissions, modify user access levels as needed:
- • Change roles
- • Enable/disable specific features

Figure 19: Viewing Account Details and Modifying Access Levels
Save changes to update permissions immediately.
Practitioner Role
Patient Records Management
Login to Nurse Dashboard. Launch the app and log in with your nurse credentials. On successful login, you'll be taken to the Nurse Dashboard.

Figure 20: Nurse Dashboard
Search for Patient: On the dashboard, enter the patient's Aadhaar Number in the search bar and tap Search to load patient details.
View comprehensive patient information that volunteers gathered including registration details and medical history.

Figure 21: Nurse Dashboard with Patient Information
Appointment Management
Check for Current Appointment in the Appointments tab.

Figure 22: Appointments Tab for Patient
If a current appointment already exists, the interface will show a reschedule option:
- • Select the Reschedule button
- • "Reschedule Appointment" section pops up with editable fields
- • Update the appointment and select 'Update'

Figure 23: Appointments Tab with Appointment

Figure 24: Reschedule Appointment Popup
If no appointment exists, a "Create Appointment" section will appear.
Create New Appointment: In the Create Appointment section, enter date (e.g., 2025-04-04), time (in 24-hour format, IST — e.g., 15:30 for 3:30 PM IST), reason for visit (e.g., "General Checkup"), and tap 'Create' Appointment.

Figure 25: Create New Appointment Tab
An "Appointment History" option becomes available. This view displays all past appointments along with their completion status—whether completed or not.

Figure 26: Appointment History of Patient
Add Notes to the Appointment
After appointment creation, go to the Diagnosis Tab.
Figure 27: Diagnosis Tab
Under Diagnosis Information, tap Add New Diagnosis. Enter notes relevant to this appointment (e.g., symptoms, prescription, observations) and tap Save Notes. Notes are now linked to this specific appointment.

Figure 28: Adding New Diagnosis

Figure 29: Diagnosis Saved to Specific Appointment